By: Dejen Mengis
Undergraduate Student
I have been working with native bees for the past 4 years now. I started at the USGS Bee Inventory Monitoring Lab at the Patuxent Wildlife Research Center as an intern in the fall of 2010 and have worked there pretty much continuously since then. As such, I have processed a lot of bee specimens and definitely know a thing or two about washing and pinning bees.
I came to the vanEngelsdorp bee lab this semester to take over the native bee survey started by Sue Boo over the summer. The last of 5 collection events was on October 9, 2014 so the bees sat in the freezer for about 2 weeks while we were getting supplies ready to begin processing. For an overview of the methodology of the study you can refer to Rachel Fahey’s November 11 post “UMD Native Bee Survey.” The bees can essentially stay in the freezer indefinitely if they are immersed in ethanol while they are in the freezer
There are a lot of ways that you can wash and dry bees, depending on factors such equipment available, desired speed, and quality of final product. However there are some basic principles of bee washing that carry through each technique. The first is that the method of collection for a sample will play a large role in the level of cleanliness you can get from the bees and the effort required to get to that cleanliness. Our samples were caught in traps filled with soapy water, so there was no problem in getting them clean. However if you catch your sample in propylene glycol or some other oily solution, you will have to use more intense washing methods, such as extensive soaking and rinsing in steaming hot water, in order to get the bees clean.
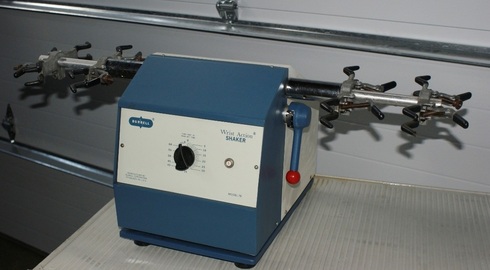
Photo Credit: Triad Scientific http://www.triadsci.com/pics/3106.jpg
For the actual washing, you will need any type of small container, such as a bowl of Tupperware or 500ml Erlenmeyer flask. Each collection event, which consists of the date and location of capture, will need its own container. First, empty the bees from the whirl-pak out of the freezer into the container. This requires a strainer of some sort and an aquarium fish net works well. Once the bees are in the container, fill it about 75% of the way with as hot water as possible and add 3 drops of Dawn dishwashing soap. Recently, we have been using laundry detergent at Patuxent since it does not produce suds, which fill up space in the container and restrict the movement of water. However either one works fine. Then, close the container and shake it vigorously for at least 3 minutes. Bees are pretty resilient so don’t worry about shaking too hard and damaging the specimens. If you wanted to be more efficient, you could use a wrist action shaker, like the one shown below, and mount several flasks to wash at once. If you do this, leave them on the machine for 20 minutes, as something about this process seems to take longer. You can watch a video of the entire shaker method below:
However the quality of bees between the two methods is the same. Once the bees are done shaking, strain them again in your net and rinse the suds out. From the net, transfer the bees onto a layer of paper towels. This is where the drying process begins. Fold the paper towels on top of themselves and lightly pat the bees down with your hands. Be careful not to crush the bees but try to get as much water out as possible so the next stage of drying goes quicker. Once you are done patting them, transfer the bees into a mason jar with a mesh screen replacing the lid. Use a hair dryer on the high setting and blow air into the mason jar, as shown below.
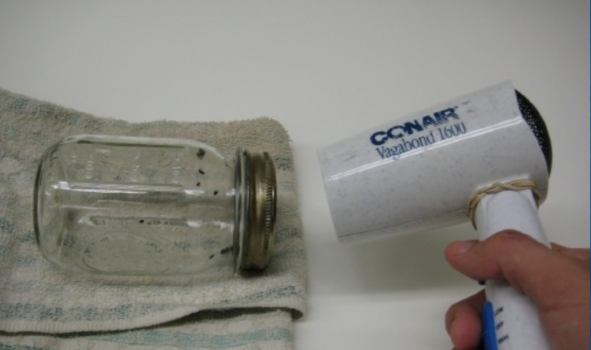
Photo Credit: USGS Bee Inventorying and Monitoring Lab
Hold the jar in your hand and continually rotate to ensure even drying. This should take about 5 minutes but there are a number of characteristics you can use to tell if the bees are dry. First, when you shake the jar, the bees should make a slight crunching sound. They also should not stick to the sides of the jar at all, as they did when they were wet. Second, the hairs of the bees should be brightly colored and fluffy. If the hairs are matted down, they are probably still wet, although they could also not have been washed very well. Dump the bees from the jar into your hand. If they feel damp at all, continue blow drying until they become completely dry.
Once the bees are dry, they are ready for pinning. Just as with washing, there are a number of different techniques you can use to pin. A common technique is to hold the specimen between your thumb and forefinger in one hand and insert the pin through the scutum on the thorax using a size 2 pin, as shown below. Then slide the insect until it is about 80% up from the top of the pin.
Once the bees are dry, they are ready for pinning. Just as with washing, there are a number of different techniques you can use to pin. A common technique is to hold the specimen between your thumb and forefinger in one hand and insert the pin through the scutum on the thorax using a size 2 pin, as shown below. Then slide the insect until it is about 80% up from the top of the pin.
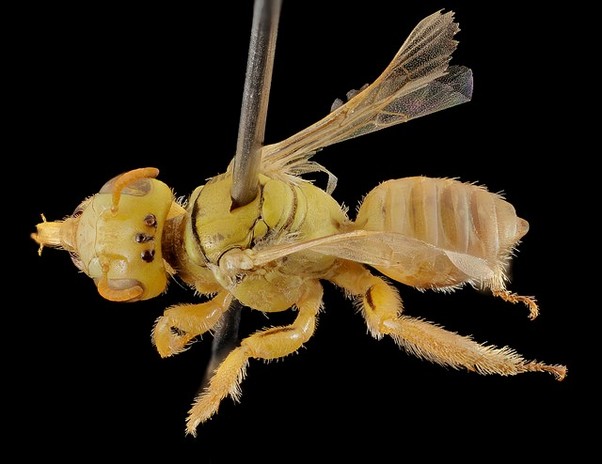
Photo Credit: USGS Bee Inventorying and Monitoring Lab
If the specimen is too small to fit a pin through without hitting some other structure, you will need to glue the specimen to the pin. Every person has their own subjective size limit for which they are comfortable pinning through. For gluing, put a small dab of glue 80% of the way to the top of the pin. Then put the bee on its back and lay the pin across the underside between the thorax and abdomen. The specimen should be position as the specimen below is. Now that the specimens are all washed and pinned, they are now ready for identification.
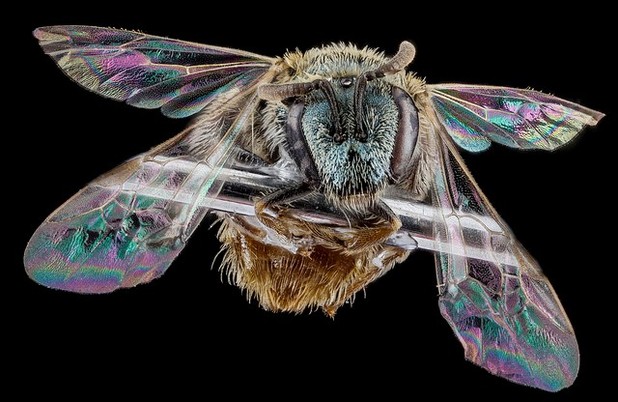
Photo Credit: USGS Bee Inventorying and Monitoring Lab
 RSS Feed